Expensive Candle Alternatives: DIY & Natural Aromatherapy

If you’re tired of spending a fortune on fancy candles that promise relaxation but often fall short, you’re in luck. Making your own candles at home can be a fun and cost-effective alternative. With a few simple ingredients and some creativity, you can craft beautiful, aromatic candles that not only smell great but are also made from natural, safe materials. In this article, we’ll explore various natural wax options, essential oils, and the DIY process to help you create your own candle masterpieces. Say goodbye to overpriced candles and hello to your new hobby: Expensive Candle Alternatives: DIY & Natural Aromatherapy.
Key Takeaways
- Natural waxes like soy, beeswax, and coconut are healthier choices than paraffin.
- Essential oils provide therapeutic benefits and can be customized for personal preferences.
- DIY candle making can be done with a small initial investment, leading to long-term savings.
- Repurposing old containers for candles is a great way to be eco-friendly and creative.
- Making your own candles allows for complete customization, from scents to designs.
Exploring Natural Wax Options
When you’re getting into candle making, one of the first things you’ll need to decide is what kind of wax to use. There are a lot of options out there, but if you’re aiming for a more natural and eco-friendly candle, you’ll want to explore natural wax options. These waxes not only burn cleaner but also offer unique characteristics that can affect the scent throw and overall feel of your candles. I remember when I first started, I was overwhelmed by all the choices, but after some experimenting, I found my favorites.
Benefits of Soy Wax
Soy wax has become super popular, and for good reason. It’s made from soybeans, a renewable resource, which makes it a much more sustainable choice than paraffin wax. Plus, it burns cleaner, producing less soot than some other waxes. This means less black stuff floating around your house and potentially better air quality. Soy wax also has a great scent throw, meaning it holds and releases fragrances well. It’s also relatively affordable and easy to work with, making it a great option for beginners. I’ve found that soy wax candles tend to have a softer, more subtle scent, which I personally prefer.
Here’s a quick rundown of soy wax benefits:
- Renewable resource
- Cleaner burning
- Good scent throw
- Relatively affordable
Advantages of Beeswax
Beeswax is another fantastic natural option. It’s made by bees, and it has a lovely, subtle honey scent of its own. Some people love this natural fragrance, while others prefer to blend it with essential oils. Beeswax is known for burning very cleanly and slowly, so your candles will last longer. It also emits negative ions when burned, which some believe can help purify the air. However, beeswax can be a bit more expensive than soy wax, and it can be a little trickier to work with. But the natural benefits are worth it.
I’ve always loved the warm, golden glow of beeswax candles. There’s something so comforting and natural about them. Plus, knowing that they’re made by bees makes them feel extra special.
Coconut Wax Characteristics
Coconut wax is a newer option on the market, and it’s gaining popularity quickly. It’s made from coconuts, and it has a creamy white appearance. Coconut wax is known for having an excellent scent throw, even better than soy wax in some cases. It also burns very cleanly and slowly. One of the biggest advantages of coconut wax is that it blends well with other natural waxes, like soy wax, to create custom blends. However, it can be more expensive than soy wax, and it may be a little harder to find. But if you’re looking for a wax with a strong scent throw and clean burn, coconut wax is definitely worth considering. For example, Coconut Apricot Wax is recommended for container candles.
Here’s a quick comparison of the three waxes:
| Wax Type | Source | Scent Throw | Burn Quality | Cost |
|---|---|---|---|---|
| Soy Wax | Soybeans | Good | Clean | Moderate |
| Beeswax | Bees | Subtle | Very Clean | Higher |
| Coconut Wax | Coconuts | Excellent | Very Clean | Higher |
Essential Oils for Aromatherapy
Popular Essential Oils
When it comes to aromatherapy, certain essential oils are basically rockstars. Lavender is a classic for relaxation, and who doesn’t love the invigorating scent of peppermint? Eucalyptus is great when you’re feeling stuffy, and chamomile can help you unwind after a long day. These oils aren’t just about smelling nice; they each have unique properties that can affect your mood and well-being. I’ve found that having a small collection of these go-to oils is super handy for different needs. You can even find essential oil diffusers to help spread the scent.
Benefits of Using Essential Oils
Essential oils aren’t just about making your house smell good; they can actually have a positive impact on your health and well-being. Aromatherapy, the practice of using essential oils, has been used for centuries to promote relaxation, reduce stress, and even alleviate certain physical ailments.
Here’s a quick rundown of some benefits:
- Stress reduction: Certain scents, like lavender and chamomile, are known for their calming effects.
- Improved sleep: Diffusing essential oils before bed can help create a relaxing atmosphere conducive to sleep.
- Mood enhancement: Citrus scents like lemon and orange can be uplifting and energizing.
I’ve personally found that using essential oils has made a noticeable difference in my stress levels. I like to diffuse lavender in my office while I work, and it really helps me stay calm and focused.
How to Choose Quality Oils
Not all essential oils are created equal. The quality of the oil can significantly impact its effectiveness and safety. Look for oils that are 100% pure and therapeutic grade. Check the label for the botanical name of the plant, the country of origin, and the extraction method. Avoid oils that contain additives or fillers. Also, consider buying from reputable brands that are transparent about their sourcing and testing practices. It might cost a bit more, but it’s worth it for the peace of mind and the better results. You can even use essential oils for candles to create a relaxing atmosphere.
DIY Candle Making Process
Gathering Your Supplies
Okay, so you’re ready to make some candles! First things first, you gotta get your stuff together. It’s way easier to have everything ready before you start melting wax, trust me. You’ll need wax (soy or beeswax are great), wicks, jars (old jam jars work!), a pot for melting, a thermometer, and essential oils if you want scented candles. Don’t forget something to stir with – a spatula or even a chopstick will do. I got most of my stuff online, but some craft stores have what you need too.
Step-by-Step Candle Making
Alright, let’s get down to business. The first step is to melt your wax. I usually do this in a double boiler – basically, a pot inside another pot with boiling water. It’s gentler and less likely to burn the wax. Once the wax is melted, let it cool down a bit before adding your essential oils. Stir them in gently. Then, attach your wicks to the bottom of your jars (wick stickers are super handy for this). Finally, pour the wax into the jars and let them sit overnight to harden. Trim the wicks the next day, and you’re good to go!
Tips for Successful Candle Making
Making candles is pretty straightforward, but here are a few things I’ve learned along the way:
- Make sure your jars are clean and dry before you pour in the wax.
- Don’t overheat the wax – it can ruin the scent and even be dangerous.
- Use a thermometer to keep an eye on the temperature.
- Let the candles cool slowly to avoid cracks.
- Experiment with different scents and waxes to find what you like best.
Candle making can be a fun and rewarding hobby. Don’t be afraid to experiment and try new things. It might take a few tries to get it perfect, but once you do, you’ll have beautiful, homemade candles that you can enjoy or give as gifts.
Creating Unique Candle Scents
Creating your own candle scents is where the real fun begins! It’s all about experimenting and finding combinations that you love. Don’t be afraid to try new things – some of the best scents come from unexpected pairings. It’s like being a perfume maker, but for your home!
Blending Essential Oils
Blending essential oils is an art and a science. The key is to understand the different scent categories – top notes, middle notes, and base notes – and how they interact. Top notes are the first scents you smell, but they fade quickly. Middle notes form the heart of the blend, and base notes provide a lasting foundation. A good blend will have a balance of all three. For example, you might combine:
- Top note: Lemon or Grapefruit
- Middle note: Lavender or Rose
- Base note: Sandalwood or Cedarwood
Experiment with different ratios until you find a blend that you love. Start with a small batch and adjust as needed. Keep a record of your recipes so you can recreate your favorites!
Using Natural Additives
Beyond essential oils, you can use other natural additives to create unique scents. Dried herbs, spices, and even coffee beans can add interesting layers to your candles. Just be careful when burning candles with essential oils or dried herbs, as they can sometimes be flammable. Some ideas include:
- Dried lavender buds for a calming scent
- Cinnamon sticks for a warm, spicy aroma
- Vanilla bean pieces for a sweet, comforting fragrance
Seasonal Scent Ideas
Seasonal scents can really capture the mood of the time of year. Think about what smells you associate with each season and try to recreate them in your candles. Here are a few ideas:
- Spring: Fresh grass, blooming flowers, citrus
- Summer: Ocean breeze, coconut, berries
- Autumn: Pumpkin spice, apple cider, cinnamon
- Winter: Pine, peppermint, vanilla
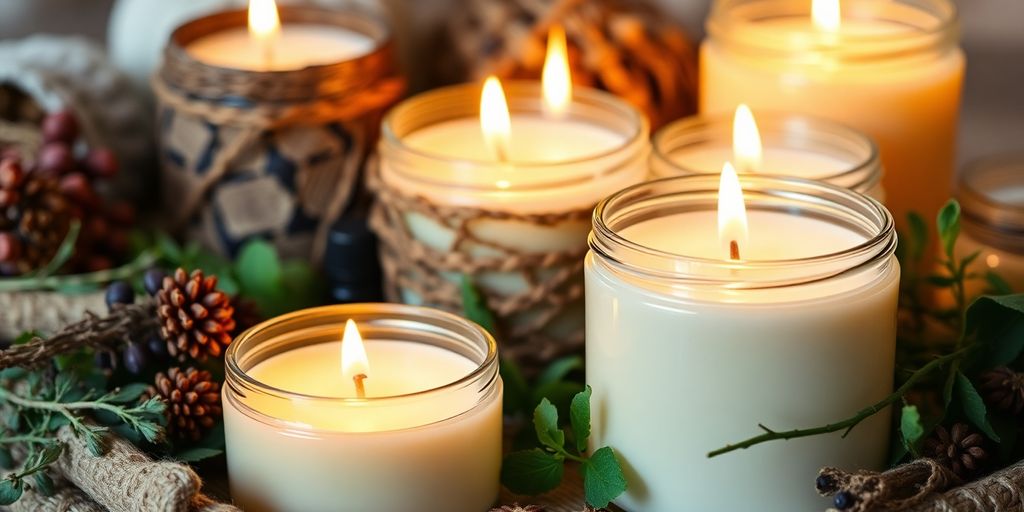
Repurposing Containers for Candles

Best Containers to Use
When you’re getting into DIY candles, one of the coolest things is figuring out what to pour your wax into. Forget buying fancy new containers all the time! You can totally give new life to stuff you already have. Think about it: old mason jars, teacups from grandma, even those cool tin cans you’ve been hoarding. The key is making sure whatever you choose is heat-safe.
- Mason jars are a classic for a reason – they’re sturdy and look great.
- Teacups add a touch of vintage charm.
- Tin cans can be surprisingly stylish with the right label.
Cleaning and Preparing Jars
Okay, so you’ve got your container. Now, let’s get it ready. If it’s an old candle jar, getting rid of the leftover wax is the first step. A simple trick? Pop the jar in the freezer for a few hours. The wax should shrink and become easier to remove. You can gently scrape it out with a spoon or butter knife. After that, wash the container with soap and hot water to get rid of any residue. Make sure it’s completely dry before you pour in your new wax. This helps the candle jar last longer.
Creative Container Ideas
Let’s get those creative juices flowing! Think beyond the usual suspects. How about using vintage coffee mugs for a cozy vibe? Or what about small ceramic bowls for a more modern look? You could even use seashells you’ve collected from the beach for a unique, natural touch. Just make sure whatever you choose can handle the heat. And don’t be afraid to get crafty! A little paint or some decorative twine can transform a plain container into something special. Remember to wrap the jars in washcloths to prevent the wax from cooling too fast.
Repurposing containers isn’t just about saving money; it’s about adding a personal touch to your candles. It’s a chance to show off your style and create something truly unique. Plus, it’s a great way to reduce waste and be a little more eco-friendly.
Cost-Effective Candle Making

Initial Investment Breakdown
Okay, so let’s talk numbers. Getting started with DIY candles does mean spending some money upfront, but don’t freak out! It’s way less than you think, and you’ll save a ton in the long run. You’ll need wax (soy or beeswax are great options), wicks, essential oils (or fragrance oils if you’re on a tighter budget), and something to melt the wax in. A basic thermometer is also a must. Don’t forget containers! You can buy new ones, but repurposing old jars is where the real savings begin. Here’s a rough idea of what you might spend:
- Wax: $20-$30 (enough for multiple candles)
- Wicks: $10 (a pack of many)
- Essential oils: $15-$30 (depending on the oils)
- Thermometer: $10
- Pouring pot/pitcher: $15
Long-Term Savings
This is where the magic happens. Once you have your initial supplies, the cost per candle drops dramatically. Think about it: you’ve already got the thermometer, pouring pot, and maybe even some essential oils. All you need to replenish is wax and wicks, which are relatively cheap when bought in bulk. Plus, you can get creative with free containers. I’ve used everything from old teacups to mason jars. The savings really add up, especially if you’re a candle addict like me!
Comparing Store-Bought vs. DIY
Let’s be real, those fancy candles at the store are expensive. You’re paying for the brand, the packaging, and the overhead. With DIY candles, you cut out all that extra cost. You’re just paying for the raw materials. Plus, you know exactly what’s going into your candles. No mystery ingredients or questionable chemicals. It’s a win-win!
Making your own candles is not only cost effective, but also gives you the freedom to create unique scents and customize every aspect of the candle to your liking. It’s a fun and rewarding hobby that can save you money while providing you with high-quality, natural candles.
The Benefits of Homemade Candles
Healthier Alternatives
Store-bought candles often contain paraffin wax, which is derived from petroleum and can release harmful toxins into the air when burned. These toxins can include benzene and toluene, which are known carcinogens. Homemade candles, on the other hand, allow you to use natural waxes like soy wax, beeswax, or coconut wax, which are much cleaner burning and release fewer pollutants. You can also control the ingredients, avoiding synthetic fragrances and dyes that can trigger allergies or sensitivities. It’s about creating a safe aromatic option for your home.
Customization Options
One of the best things about making your own candles is the ability to completely customize them to your preferences. You can choose your favorite scents by blending essential oils, select the perfect wax for your needs, and even add natural additives like dried flowers or herbs for visual appeal. This level of customization is simply not possible with store-bought candles, which are often mass-produced with generic scents and ingredients. You can tailor the scent to match the season, your mood, or even a specific event. It’s a fun way to express your creativity and create something truly unique.
Eco-Friendly Practices
Making your own candles is a great way to reduce your environmental impact. By using natural waxes and essential oils, you’re avoiding the harmful chemicals and synthetic fragrances found in many commercial candles. You can also repurpose old jars and containers, giving them a new life and reducing waste. Plus, you can buy wax in bulk to minimize packaging and further reduce your carbon footprint. It’s a small change that can make a big difference for the planet.
Making your own candles is not only a fun and rewarding hobby, but it’s also a way to create a healthier and more sustainable home environment. By choosing natural ingredients and repurposing containers, you can reduce your exposure to harmful chemicals and minimize your impact on the planet. Plus, you’ll have the satisfaction of knowing that you created something beautiful and unique with your own two hands.
Wrapping It Up: DIY Candles Are Worth It
In the end, making your own candles is not just a fun project, it can also save you some cash. Sure, you might spend a little upfront on supplies like wax and wicks, but think about it: you can create a bunch of candles for the price of just one fancy store-bought one. Plus, you get to pick your scents and know exactly what’s in them. No more worrying about weird chemicals or artificial fragrances. And let’s be real, there’s something pretty satisfying about saying, "I made this!" So, if you’re looking to brighten up your space or give thoughtful gifts, why not give DIY candles a shot? You might just find a new favorite hobby.
Frequently Asked Questions
What types of natural wax are best for homemade candles?
The best natural waxes to use for making candles at home are soy wax, beeswax, and coconut wax. They all burn cleanly and are better for your health compared to paraffin wax.
How do essential oils differ from fragrance oils?
Essential oils come from real plants and have natural scents, while fragrance oils are made in a lab and can be synthetic. Essential oils are usually better for aromatherapy.
What supplies do I need to start making candles?
To make candles, you will need wax, wicks, containers, and essential oils. You may also want a double boiler or a measuring cup for melting the wax.
How can I make my candle scents unique?
You can create unique scents by mixing different essential oils together. Try combining floral scents with citrus or woody scents for something special!
Is making candles at home really cheaper than buying them?
Yes, making your own candles can save you money in the long run. Once you buy the supplies, you can make many candles for a fraction of the cost of store-bought ones.
What are the benefits of using homemade candles?
Homemade candles are often healthier because they use natural ingredients. You can customize the scents and shapes, and they are better for the environment.


Responses